Permanent Makeup Colour Theory
Understanding permanent makeup colour theory is vital for PMU artists, as colour and pigment selection can be one of the most difficult aspects to get right in permanent makeup.
While traditional makeup sits on top of the skin, permanent makeup is implanted underneath it - so healed results are essentially the colour of the pigment as seen through the filter of your client’s skin colour, and are affected by both their value and undertones.
Here’s our guide to colour theory in permanent makeup, to help you always choose the correct pigment for your client’s unique skin type!
- What is colour theory, and why is it important?
- The Colour Wheel
- Colour Values
- Skin Undertones
- Fitzpatrick Skin Scale
- Understanding Pigment Science
- How to select correct pigment shade
- Colour correction
- PMU Removal
1. What is colour theory, and why is it important
To achieve the perfect harmony between the undertones of the pigment and the undertones of the skin, we must first understand basic colour theory.
By understanding the way colours work together and how the human eye perceives them, PMU artists can choose the correct pigment shade for their client that works with their value/skin tone, rather than against it. It’s also an invaluable tool when it comes to correcting previous treatments!
Without proper training, colour selection in permanent makeup can easily go wrong, especially with the different, delicate nature of facial skin. The different cellular structure and higher sebaceous activity mean that colour is more likely to change while healing when compared with a more traditional tattoo.
2. The Colour Wheel

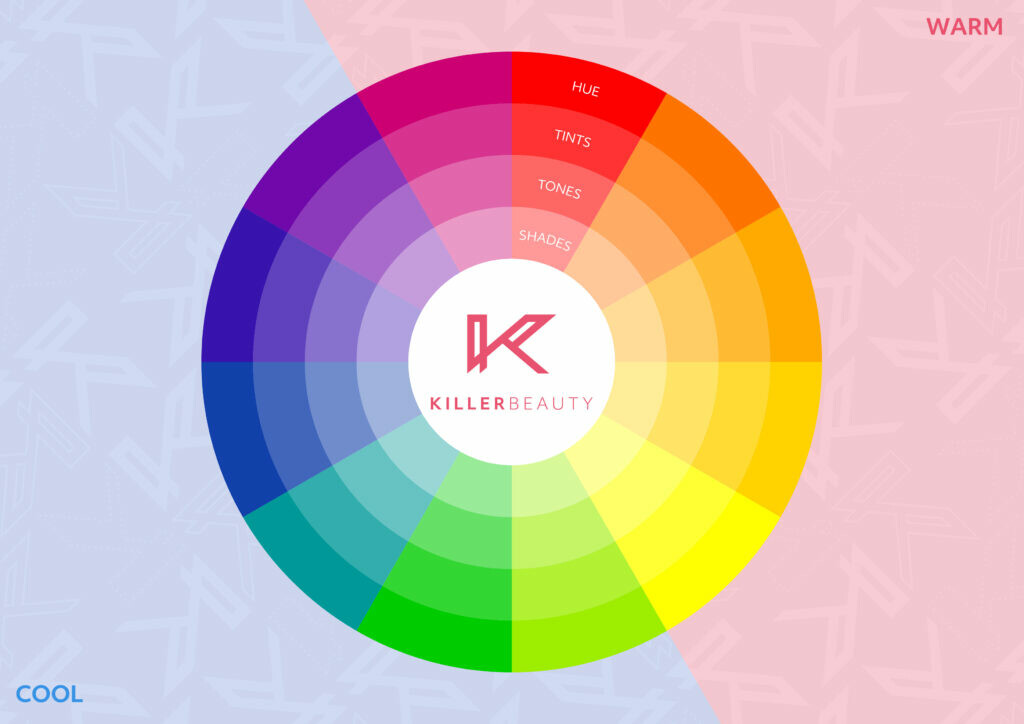
The colour wheel is an invaluable tool when it comes to understanding colours, as it separates them out into three categories: primary, secondary, and tertiary colours (which are a combination of primary and secondary). You can also split these colours into cool and warm tones, with complimentary colours lying opposite on the colour wheel. Complimentary colours can be mixed together to cancel each other out.
Primary: red, yellow, blue.
Secondary: violet, orange, green.
Tertiary: lime green, turquoise, blue-violet, crimson, red-orange, yellow-orange.
Many pigment manufacturers use yellow, green, red, black and white tones to create natural makeup looks on their clients, and will usually skew warmer or cooler. Understanding how these colours work together in your pigment is paramount in selecting the right colour for your client!
3. Colour Values
Colour values are another way we can better understand the relationship between our clients’ skin and the pigments we use every day. In her video on colour theory, Natalie Della-Verde showcases how she uses a scale of values from 1-10 which can be applied to both pigments and skin tones. The deeper the colour, the darker the in value that colour is.
In order for the pigment to show through the healed skin tone, it must have a darker value than the skin - but if you go too much darker, the contrast can be too great, resulting in an unnatural finished look. Choosing a pigment that is too light in value means there will not be enough contrast and the healed result may not be visible.
4. Skin Undertones
Finding your client’s undertone is an essential part of picking the right colour pigment for them.
Most people will fall into one of three categories: cool, warm, or neutral. “Cool” toned clients will need a higher proportion of warmth to neutralise their naturally cool tones, and vice versa. Using cool pigments on a cool-skinned client could result in blue/grey healed results, while warm pigments on a warm client could heal red or orange.
Cool skin is usually ivory or fair. It burns easily in the sun, may be prone to redness or flushing, and is usually accompanied by lighter eye colours.
Neutral skin might be fair, olive or golden. It’s likely to take a tan well, and might have peachy, or yellow undertones.
Warm skin tones tend to be found in darker skin and are usually accompanied by dark hair and dark eyes. People with this skin type won’t burn easily in the sun.
It’s easy to assume that neutral skin tones will work with any type of pigment, but it’s important to assess the skin closely for yellow/peachy undertones that might affect the healed results.
Using a questionnaire for your clients is a quick and easy way to identify their undertones – this will question them on their natural hair colour, eye colour and how they skin reacts in the sun.
5. Fitzpatrick Skin Scale

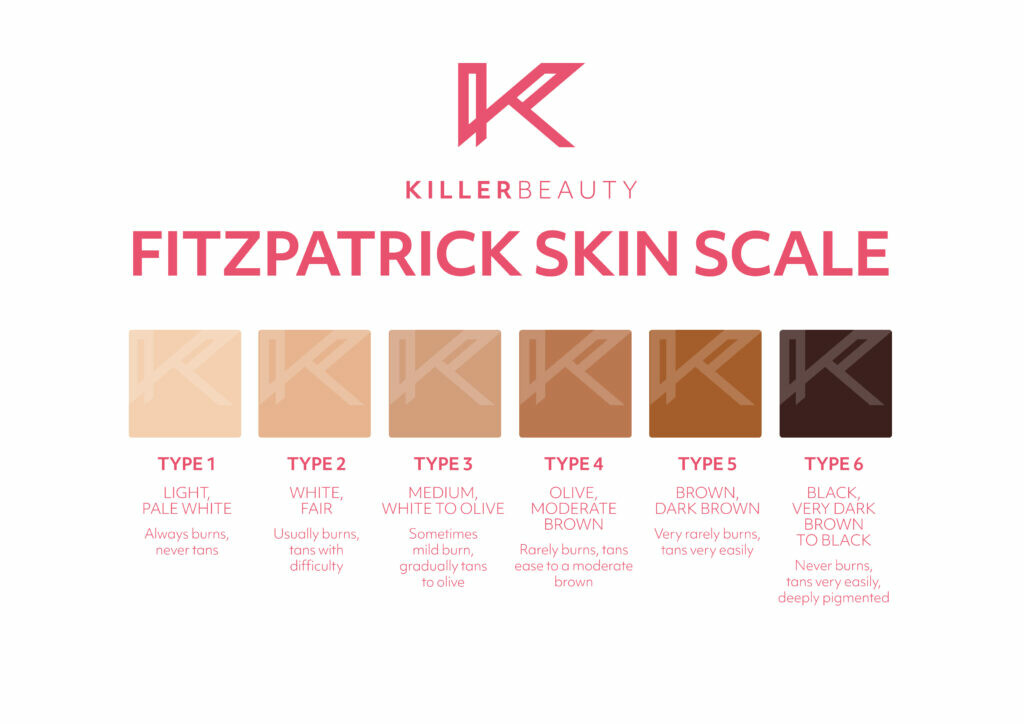
The Fitzpatrick Skin Scale, developed by Thomas Fitzpatrick in the 1970s, defines 7 skin tones based on their response to UV light - essentially, how much melanin exists naturally in the skin.
This is one tool that PMU artists can use to identify skin colours and tones before choosing the most appropriate pigment. You don’t even need to do an assessment yourself - just ask them to complete a simple questionnaire and use that score to find their skin type number.
Typically, Fitzpatrick types 1 to 3 have cool undertones, while types 4 to 6 are warm, but this isn’t always the case. Some artists feel that this scale is out-dated and the industry requires a more updated skin scale, whereas others are comfortable and happy using this scale. It always comes down to preference and what works for you and your clients!
6. Understanding Pigment Science
Having an understanding of the chemistry that goes into creating your favourite pigments can help you better understand what works and why - and we promise you won’t need a PhD to get it!
Every pigment will have its own formulation of four elements - a coloured powder (the actual pigment), the carrier fluid it needs to travel into the skin, the binding agent that keeps the powder in the carrier fluid, and a preservative to help prevent contamination once you’ve opened the bottle.
The powdered pigments will be either organic - made from carbon-hydrogen bonds - inorganic - derived from natural minerals like iron oxide - or hybrid, which is a combination.
The important things you need to know are that organic pigments have smaller particles, reflect more light, may be implanted easier, and will probably heal brighter. Depending on each client’s skin and the desired results, you’ll likely use a variety of organic, inorganic and hybrid pigments throughout your work! Read more about that on our dedicated blog on Organic vs Inorganic Pigments.
One common inorganic pigment is Titanium Dioxide, which is white in colour with a strong opacity. Pigment manufacturers love using it because it increases the visibility and stability of the pigments, while its reflective properties help the finished effect to look naturally healthy and luminous. We’ve got a whole blog where we explain the benefits of Titanium Dioxide in great detail!
7. How to select correct pigment shade
Luckily, most PMU pigment brands will provide you with information about whether their shades have warm or cool tones, what the base colours are (such as green or yellow), and which skin tones it’s most suitable for. Some pigment sets even come with shade charts that take all the guesswork out of choosing the right one!
Looking at what CI numbers are within each individual bottle, either on a colour chart or the label of the bottle, will help you have a clear understanding of what colourants are in this pigment – so you can identify if it is the right choice for this specific client.
Selecting the right pigment is a matter of training, experience, and personal preference - what you’d choose at the beginning of your career is often different to what you’d used when you’re more experienced! You can use the Fitzpatrick scale and colour wheel to swatch different pigments to see how they work with the client’s undertones, but we’d advise that you apply some Killer Beauty petroleum jelly first to prevent the pigment from drying or staining the skin.
We’d always suggest going for a lighter shade for the initial appointment, as healed results may be cooler or darker than intended - you can then use a darker or bolder colour at the top-up appointment.
Brands like Perma Blend, Li Pigments and Ever After are carefully formulated for specific skin tones, and usually won’t need to be mixed. However, a drop or two of a complimentary shade can help to achieve more natural, long-lasting results.
8. Colour correction
Most artists wouldn’t correct another artist’s work until they were more experienced, confident and established. However, top-up appointments are a chance for artists to correct anything that their existing client isn’t happy with – including colour.
Colour theory and selection can be quite daunting, but the top-up appointment is there to give artists the chance to correct any colour mistakes. If you have had proper training, used a reputable pigment brand and you understand colour theory, it is unlikely that a colour will go wrong. However, even if it does, the error shouldn’t be too dramatic or difficult to fix.
Some brands' product descriptions will tell you if a pigment shade can be used to counteract red-toned pigment or blue/grey tones. You can also use your understanding of the colour wheel to find the colour that will neutralise the tone you wish to correct – for example, yellow and orange-based pigments will neutralise blue or ashy tones as they are opposite each other on the wheel.
Brands such as Perma Blend also sell ‘correctors’ – pigments which can be added to shades to neutralise unwanted colour in healed results. Adding a drop or two of corrector to the pigment at the top-up stage will help neutralise any unwanted shades and give a much more natural result.
As always, any colour correction should be asses on a case by case basis – including how many PMU sessions the client has had previously. If the skin is oversaturated, the only safe option may be removal and starting afresh once healed. We go into removal in more detail below!
9. PMU Removal
Whether it’s old work, poorly done work, or just doesn’t have the effect the client was after, there is likely to be a point in your career where you have to consider removing and/or covering up a previous PMU treatment.
We’ve talked a lot about how to avoid this situation in the first place in our PMU Removal - Is It Inevitable? blog, but for now we’ll concentrate on the most common methods of removal - laser treatment, chemical, and saline removal.
Laser removal uses targeted laser beams to break down the pigment particles under the skin, so your body can clear them out. The effectiveness of this treatment depends on the client’s skin type, skin colour, pigment colour and pigment contents, and it isn’t suitable for all treatments.
Saline removal works through osmosis, with the artist implanting a saline solution that lifts and expels the pigment particles - it’s less invasive than laser, saline is totally safe for the body, and you can get good results in fewer sessions.
Chemical, also known as acid removal, is similar to saline removal but using an active ingredient that also breaks down the pigment as it’s lifted.
We always hear great things about Li-FT Pigment Lightening Solution, one of the safest methods of saline lightening and removal on the market! It’s full of natural, antifungal, anti-bacterial and anti-inflammatory properties, but it should only be used by artists who have completed the relevant training course.
We hope we have covered the basics around understanding colour theory, skin tone, colour selection and correction. If you ever have questions, don’t be afraid to ask and always take your time during consultation to assess your client’s skin and select an appropriate colour.
If you have had proper training and use the high-quality pigment brands that we stock at Killer Beauty, colour disasters should be a very rare occurrence!


